7. Additional Stuff
7.1 - Avoiding colorloss
Sometimes, you want to use an image which has (much) more than 256 colors. Hence, when you convert it to indexed colors, the quality of the image goes down proportionally to the number of colors it had at the beginning. There are 3 methods to avoid colorloss.
Jiggsaw Method :
It consist in cutting the original image in many little pieces, then display all the pieces at the correct place in the stage. Each small piece having less colors than the original image, you lose less colors when you convert it to indexed colors. The optimal size for the tiles using this method is 16x16 pixels, since 16^2=256, hence a tile will contain 256 colors maximum, and you're sure to avoid colorloss. However, cutting an image into tiles of this size is insane and results in too many tiles. Using 25x25 or even 50x50 tiles if the image doesn't have too many gradients is often enough.
Here is a quote by XGargoyle about handling the Jiggsaw method with Photoshop :
- Your psd file contains all the tiles arranged correctly, but each tile is a different layer
- Export each layer as a different 8-bit indexed pcx. Use photoshop's excellent tools such as batch automation, actions and scripts
- Each resulting pcx will have the same size (i.e. 800x1200) and they will consist on a tile placed somewhere and the rest is just the magenta background
- Now create the text file for sffmaker. Placing the axis is easy because you don't have to do any calculation at all. All the sprites will have the same axis
- Finally build the SFF and make sure the crop option is enabled in the command line (so your sprites are optimized and reduce filesize)
RGB Method :
It's the most common method nowadays, even though it has its flaws. It consists in separating the image into its 3 channels : red, green and blue (RGB), with a graphical software. Then, in Mugen, you can reconstitute the image by placing the images one over the other with transparency.
While this method ensure no colorloss and is very quick to use, it results in a white screen when characters use alpha ctrls.
For more information about this method, reffer to this topic by Jango : The RGB Method.
ImageSplitter :
A method using a tool developed by AokManiac13, after [E] told him about the algorithm.
To get the tool, go here : http://randomselect.piiym.net/ -> Download Tools -> General Purpose Tools -> ImageSplitter.
Using this command-line tool, you will get many uncropped layers, which you will just have to insert in the SFF, all with the same axes. Then, you just have to write the code for one layer and do some copy-pasting job to display the others.
The only problem with this method is that it may generate a high number of layers (something like 50), and Mugen may not be able to handle that properly without having your framerate go down drastically.
7.2 - Other Animation Codes
While we have learned how to code simple animations, there are other parameters you can add to achieve different kind of effects. Here's a short list of these parameters.
- Infinite time :
You may want an animation to stop on a particular sprite and display it indefinitely, until the end of the fight. To do this, you just have to set the time (number of ticks) of the sprite to -1, as such :
[Begin Action 123]
123,0,0,0,4
123,1,0,0,4
123,2,0,0,4
123,3,0,0,4
123,4,0,0,-1
Sprite 123,4 will be displayed for an infinite time.
- Turning the sprites :
If you have sprites you need to turn horizontally or vertically, you don't have to include them several times in the SFF after having modified them with Photoshop. You can do this simple rotation effect in the definition of your animation. Using "H" at the end of the line will turn the sprite horizontally, and using "V" will turn it vertically. You can use "HV" to do both :
[Begin Action WTF Flip]
10,2,0,0,5 ;Normal sprite
10,2,0,0,5,H ;Sprite with horizontal symmetry
10,2,0,0,5,V ;Sprite with vertical symmetry
10,2,0,0,5,HV ;Sprite with horizontal and vertical symmetry.
- Adding transparency :
We previously used the "trans" parameter in normal sprites to make the clouds transparent. However, when defining an animation, you may want to define the transparency within the animation itself. This is done by adding some other code at the end of the line :
[Begin Action WTF Trans]
10,2,0,0,5		;Normal sprite
10,2,0,0,5,,A	;Additive transparency (identical to trans=add)
10,2,0,0,5,,A1	;Additive transparency with background dimmed to 50% brightness (identical to trans=add1)
10,2,0,0,5,,S	;Substractive transparency (identical to trans=sub)
notice the two ",,". These are made because the code between the commas is made to flip the sprites, as we have seen in the precedent paragraph.
If you're using WinMugen or Linux Mugen (but not DOS Mugen), you can also define the transparency better as if you were using "trans = AddAlpha". This is done by using ASxxxDyyy, with "xxx" being the source, and "yyy" the destination, both values being between 0 and 256. If you want to make an animation fade out, you would use a code like this :
[Begin Action 16];Fading Out
16,0, 0,0, 4,,A
...
16,13, 0,0, 4,,A
16,14, 0,0, 4,,A
16,15, 0,0, 4,,AS200D256
16,16, 0,0, 4,,AS160D256
16,17, 0,0, 4,,AS120D256
16,18, 0,0, 4,,AS80D256
16,19, 0,0, 4,,AS40D256
16,-1, 0,0, 40,,AS40D256
The last line means that you're using and empty sprite.
- LoopStart :
This parameters allows you to define a point from which the animation will loop. An example being better than hundreds of explanations :
[begin Action 10]
10,0,0,0,5
10,1,0,0,5
10,2,0,0,5
10,3,0,0,5
10,4,0,0,5
LoopStart
10,5,0,0,5
10,6,0,0,5
10,7,0,0,5
10,8,0,0,5
10,9,0,0,5
The LoopStart is defined for sprite 10,5, which means the animation will loop from there. Hence, the animation will display the sprites from group 10 in this order :
0 1 2 3 4 5 6 7 8 9 5 6 7 8 9 5 6 7 8 9 ...
7.3 - Foreground Images - The BlackJack Method
You may have noticed in the tutorial a line of code concerning the number of the layer :
layerno = 0
This code was present in the sky or the moving mushroom for example.
Most sprites use this layer number of 0, which means that they appear behind the characters. However, you may sometimes want to include some elements in front of the characters. It may be a layers of snow as it can be an element on the ground closer to the screen than the characters. To do this, you just have to change the layerno to 1 :
layerno = 1
Sprites with layerno=1 follow the same rules as the sprites with layerno=0, which means that they appear in the same order as the order you've coded them in the DEF file. Hence, you should be careful if you have several items with layerno=1. However, these sprites will always appear in front of sprites with layerno=0, whatever the place where you code them in the DEF file.
Using a foreground element of this type, you can achieve effects of this type :
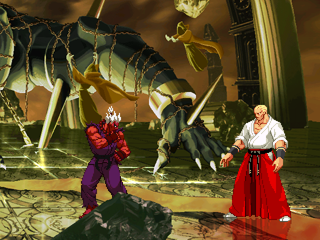
However, while this effect can be neat, it may sometimes clutter the fight and make the fighters disappear behind a huge foreground element, which is not suitable. A simple solution to this is to make the foreground element transparent. However, if you limit yourself to this, the foreground element will appear entirely transparent, and background elements will be seen through it, which is not very nice.
The good method is called the BlackJack method (the name of the guy who found this method) : you just copy-paste the code for your foreground element. You set the first one to layerno=0, and you give to the one with layerno=1 some transparency. Your code should go from :
[BG foreground]
type = normal
spriteno = 10, 0
layerno = 1
start = 0,0
delta = 1,1
trans = none
mask = 1

to this :

[BG foreground 1]
type = normal
spriteno = 10, 0
layerno = 0
start = 0,0
delta = 1,1
trans = none
mask = 1

[BG foreground 2 trans]
type = normal
spriteno = 10, 0
layerno = 1
start = 0,0
delta = 1,1
trans = add1
mask = 1
I used "add1", but you can use "add" or "addalpha" if you want. By doing this, the same stage now looks like this :
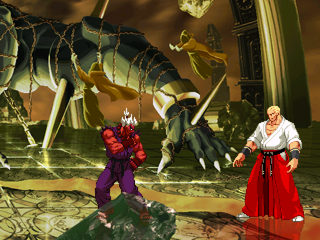
The sprite will appear as normally as before, but will be transparent when a character passes behind it.
Nono used an alternative version of this code by using "add" and "sub" at the same time, you can check it by looking at this topic.
7.4 - BG Controllers
These are very powerful tools I won't be explaining here. You should report to the Mugen Docs for more information. Look at here, Part IV for more information about Background Controllers.
Tamez also wrote in-depth tutorials about Background Controllers, explaining Animation Change, VelSet and VelAdd, click here for the link to the tutorial videos.
However, as pointed out by Mike Werewolf in his French translation of the Mugen Docs, there's a mistake in the simple example given at the end of the file. Here's a corrected version, just for you :
-- Simple Example -
Suppose we want to make a person walk back and forth from (-300,0) to (300,0), right behind the main characters. We'll use background controllers to accomplish this task.
First, define the walking animations. Say that the character's walking sprites are 10,0 through 10,3 and that they face to the right.
; Walk right
[Begin Action 10]
10,0,0,0,6
10,1,0,0,6
10,2,0,0,6
10,3,0,0,6

; Walk left
[Begin Action 11]
10,0,0,0,6,H
10,1,0,0,6,H
10,2,0,0,6,H
10,3,0,0,6,H


Now start the character off at the far left edge of his range.

[BGDef]
(...)

[BG Peregrinator]
type = anim
actionno = 10
id = 10
start = -300, 0
delta = 1,1
Let's give Peregrinator a comfortable ambling speed of 2 pixels per tick. The one-way distance for his walk is 600 pixels, which will take 300 ticks. In total, it'll take him 600 ticks to make the round trip. Using this knowledge, set up the background controllers appropriately: since the entire situation repeats every 600 ticks, we can set the global looptime to 600.
[BGCtrlDef Peregrinator]
; reset the whole deal every 600 ticks.
looptime = 600
ctrlID = 10

; Set velocity of 2 pixels/sec rightward at time 0.
[BGCtrl Walk Right]
type = VelSet
time = 0
x = 2

; Set velocity of 2 pixels/sec leftward at time 300.
[BGCtrl Walk Left]
type = VelSet
time = 300
x = -2
NB from Mike Werewolf : Elecbyte forgot a part of the code. As it is now, the code makes the peregrinator go from left to right and vice-versa, but the anim always stays the same, with the peregrinator facing right. Hence, in the secind phase of the BGCtrl (walk to the left), the peregrinator will be doing a moonwalk. To correct this, we will add a BGCtrl to change the animation in the middle of the walk :
[BGCtrl Turn to the Left]
type = Anim
time = 300
value = 11
However, following the same idea, with the previous code, the peregrinator will indeed use anim 11 from time=300, but when the BGCtrlDef womes back to the beginning of the loop, it didn't receive any other indication, hence it will continue using anim 11, and we will start getting the moonwalk at the second loop. We just have to add a new BGCtrl. The whole code for this part becomes this :
[BGCtrlDef Peregrinator]
; reset the whole deal every 600 ticks.
looptime = 600
ctrlID = 10

; Set velocity of 2 pixels/sec rightward at time 0.
[BGCtrl Walk Right]
type = VelSet
time = 0
x = 2

[BGCtrl Turn to the Right]
type = Anim
time = 0
value = 10

; Set velocity of 2 pixels/sec leftward at time 300.
[BGCtrl Walk Left]
type = VelSet
time = 300
x = -2

[BGCtrl Turn to the Left]
type = Anim
time = 300
value = 11
And that's it! You can make the walk look better by having Peregrinator slow down and display a turning animation at each end of his walk. This would entail use of the VelAdd and Anim controllers. If you want Peregrinator to stop and start at regular intervals as he goes from one end to the other, you could create more VelSet and Anim controllers with their own individual looptimes (to get the behavior to repeat at regular intervals).
Finally, there is another mistake in the Mugen Docs. They specify that the syntax is :
[BGCtrl]
type = Enabled
However, having the "d" on the end will make mugen crash. It needs to be:
[BGCtrl]
type = Enable
7.5 - Misc. Stuff - Parallax
This is an effect you can apply to the floor, to make it move as the characters move. If you do it correctly, it can achieve nice effects, but is horrible if done badly. You can't go by eye with this method, and will have to use some Maths to code it properly.
As I have never used this method, I will link you to two tutorials :
1 - VIB's method : http://www.geocities.com/vibhp/mugen/tuto/parallax.html http://mugenguild.com/forumx/index.php?topic=116138.0
2 - Winane's method: http://www.justnopoint.com/Dev/index28.php.htm (don't forget to read the last post)
Also, thanks to Dark Saviour for these videos :
Here are illustrations that might help you, check what happens under Vice's feet when the stage scrolls:
1 - A bad parallax: click here
2 - A good parallax: click here
If you need more informations about parallax, do a search in the forum with "parallax jackson" (yes, I'm serious), by user "Ziltama". 


